Cheapest Factory Hook Bolts Wholesale to Berlin
Short Description:
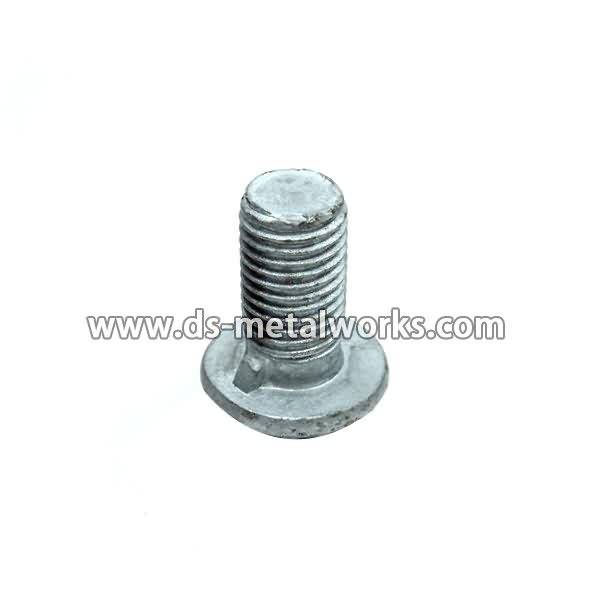
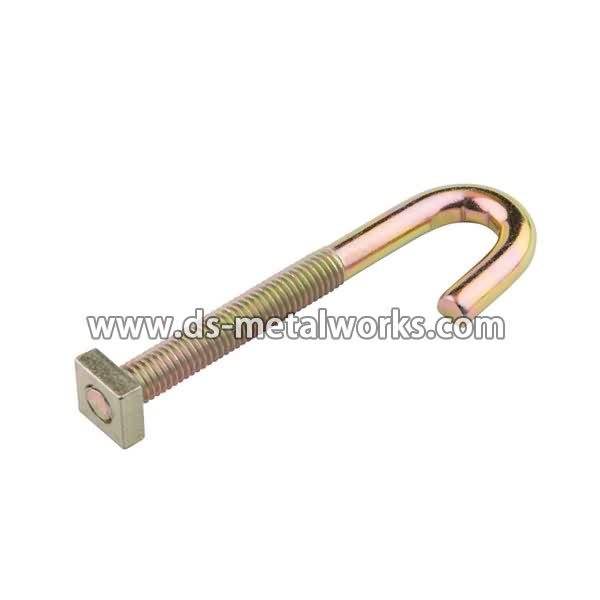
A range of hook bolts, used in the roofing industry for fixing cladding and roofing panels to steel frames. Hook bolts, also commonly known as ‘J’ bolts and supplied with nuts. Inch Thread Size: 1/4″-4″ with various lengths Metric Thread Size: M6-100 with various lengths Material Grade: Carbon Steel, Alloy Steel, and Stainless Steel covers ASTM F1554, A307, A449, A354, A193, A320, F593, ISO 898-1 4.8, 6.8, 8.8, 10.9 Finish: Plain, Black Oxide, Zinc Plated, Hot Dipped ...
Product Detail
Product Tags
Cheapest Factory Hook Bolts Wholesale to Berlin Detail:
A range of hook bolts, used in the roofing industry for fixing cladding and roofing panels to steel frames. Hook bolts, also commonly known as ‘J’ bolts and supplied with nuts.
Inch Thread Size: 1/4″-4″ with various lengths
Metric Thread Size: M6-100 with various lengths
Material Grade: Carbon Steel, Alloy Steel, and Stainless Steel covers ASTM F1554, A307, A449, A354, A193, A320, F593, ISO 898-1 4.8, 6.8, 8.8, 10.9
Finish: Plain, Black Oxide, Zinc Plated, Hot Dipped Galvanized, and so on.
Packing: Bulk about 25 kgs each carton, 36 cartons each pallet. Or, comply with your requirement.
Advantage: High Quality and Strict Quality Control, Competitive price,Timely delivery; Technical support, Supply Test Reports
Please feel free to contact us for more details.
Product detail pictures:
we could supply good quality goods, aggressive cost and very best purchaser assistance. Our destination is You come here with difficulty and we supply you with a smile to take away for Cheapest Factory Hook Bolts Wholesale to Berlin, The product will supply to all over the world, such as: Somalia, Tajikistan, Rotterdam, We pay high attention to customer service, and cherish every customer. We have maintained a strong reputation in the industry for many years. We are honest and work on building a long-term relationship with our customers.
https://www.etrailer.com/tv-demo_trailer_brakes_and_wiring.aspx
Videos are provided as a guide only. Refer to manufacturer
installation instructions and specs for complete information.
Today we are going to show you how to install brakes on a trailer that does not have existing brakes. It is actually pretty easy to do it is just very time consuming. There are a few things you want to look out for before you start. One of those things is look being the existing hub you have. Make sure you have a flange like this on the axle. It is this 4 bolt flange on here if you have that on your axle your pretty much home free. You will see it on 3,500 pound axles like we have here. You also see it on 2,000 pound axles. On a 3,500 pound one you would probably use a 10 inch drum and on a lighter 2000 pounds, you would use a 7 inch size. Also you notice we have the hub missing. We have to take that off because the hub and drum assembly it is all in one piece. You have to take off the old hub get rid of it and start off fresh. For this install we are going to install the backing plate. Basically it slides on like so then you just bolt it onto 4 places. A couple things you might want to take note of is there is a left and right side to it also an up and down. The magnet always stays pointed to the ground. If you did not have a sticker like this one does another way to tell is look for this bow here. The actuating arm or bow always points to the front of the trailer so thats a good reference point for you. At this point lets start bolting on our hubs. Works down in a criss cross pattern makes sure you have them evenly tightened. Go ahead and do the same thing for the other side. One thing to note while you are adding the hubs to a trailer. This is double protection that keeps grease in and has a little bit extra pressure. You can also tell it is a double lip seal because it has a spring. Every double lip seal out there has a spring in it. So you have an EZ Lube Spindle or double check. Some spindles like this one come with a tang washer. If yours is just the normal spindle then you just have a counter pin that goes through. In this case we have the EZ Lube spindle so we will go ahead and assemble it. It is only one extra step involved. Make sure you take out any play. A little bit is fine just a hair is all you need. Then flip this edge into place like so. Get it to stop then bring it back one notch. If you had a regular spindle we would be finished by now but since we have the EZ Lube spindle we will go ahead and use that feature fully pack the bearings and bring out the grease to both bearings. Installing our hub is complete now. The next step is to adjust the brakes. From here what we need to do is go ahead and adjust our brakes. Basically what we are going to do is tighten up the drum until it stops turning. Then back off 10 clicks then you should have a very fine light drag. What we need to do now is go ahead and start running the wires. We are going to follow the factory harness back onto the driver side wheel. Then we are going to follow the axle on over to the passenger side wheel. Once you are by the axle here go ahead and leave a little loop for working room. Then make sure it is tied to your passenger side wheel. We will go ahead and at this point zip tie the wire to the axle. At this point you have your wire set across the axle the way you want it so we will go ahead and pull the slack up to the front of the trailer. We will go ahead and make our connection to the wires here. Make sure you note that one wire goes to ground and the other wire goes to positive. Again it does not matter the magnet does not care. We will move over to our driver side now and what we are going to do is install our ground on the inside of the frame here. We are going to put our 7 pole connector on next. It is time to connect to 7 pole connector. What you want to do is match up the colors obviously but there are a few different codes. For instance sometimes red is left turn but on the trailer it is actually yellow. The only common ones is white is ground wire and blue will be used as our black wire. Which the black wire is actually used on here as the 12 volt power lead. We will start off with the ones that match up and that would be the white. Then we will do the brake wire and on the trailer it is black but on the 7 pole it will be blue. Left turn on our trailer is yellow but the left turn on our 7 pole is red. We have green here which is running light and on the trailer it is brown. Finally green is right turn on our trailer and that is brown on our 7 pole. Next we put our connector back in with the little screw. We fix our loom and tighten the last screw.