Factory making Brass Tip Socket Set Screws for Lithuania Factory
Short Description:
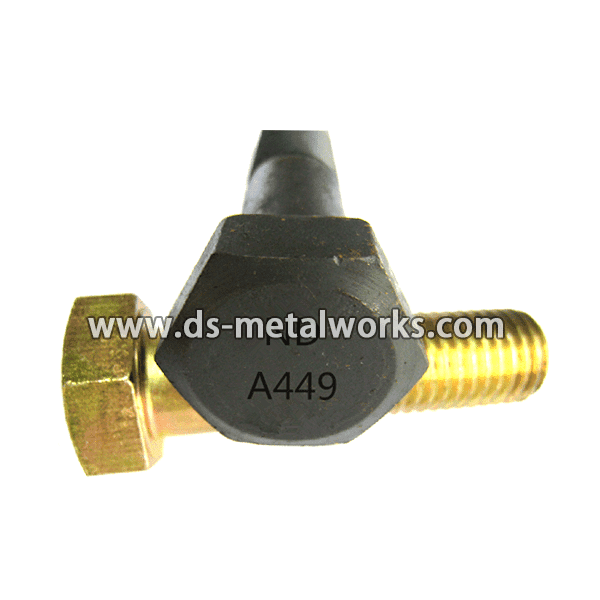
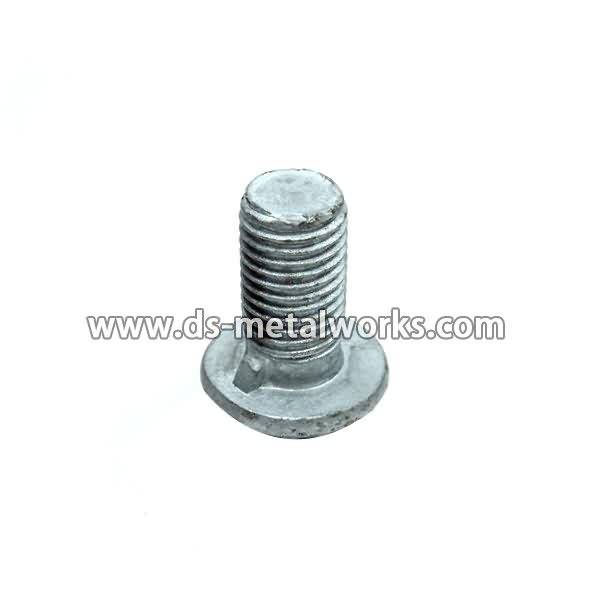
Brass Tip Socket Set Screws Metric Size: M1.4-M52, Inch Size: 0# – 2″ Various Drive and Point Types Various Surface Finishes Other Material Grades are available Please feel free to contact us for more details
Product Detail
Product Tags
Factory making Brass Tip Socket Set Screws for Lithuania Factory Detail:
Brass Tip Socket Set Screws
Metric Size: M1.4-M52, Inch Size: 0# – 2″
Various Drive and Point Types
Various Surface Finishes
Other Material Grades are available
Please feel free to contact us for more details
Product detail pictures:

It adheres on the tenet Honest, industrious, enterprising, innovative to develop new items frequently. It regards buyers, success as its very own success. Let us produce prosperous future hand in hand for Factory making Brass Tip Socket Set Screws for Lithuania Factory, The product will supply to all over the world, such as: Melbourne, Egypt, Suriname, Now we have a dedicated and aggressive sales team, and many branches, catering to our main customers. We have been looking for long-term business partnerships, and ensure our suppliers that they will undoubtedly benefit in both short and long run.
Watch more Bathroom Repair videos: https://www.howcast.com/videos/394212-How-to-Fix-a-Toilet-Flange
If your toilet wobbles, has a leak, or if you smell sewer gas in your bathroom, you may have a broken flange.
Step 1: Remove old flange
Remove the old flange by breaking it away from the drainpipe, or closet bend, with a small sledgehammer and a cold chisel. The flange is made of cast iron, so it will break away fairly easily. Once it’s broken, pry it up and out with a pry bar.
Tip
Be careful not to damage the closet bend when you’re removing the flange.
Step 2: Fit new flange over closet bend
Set the new flange over the closet bend and mark any spots on the floor where it doesn’t lay flush. Remove the new flange and use the hammer and chisel again to break away the parts of the floor you marked. If the flange doesn’t sit flush with the floor, the toilet will wobble.
Step 3: Install rubber gasket and brass ring
Fit the rubber gasket between the inside of the flange and the closet bend, tapered edge down. Then fit the brass ring over the rubber gasket, tapping it into place with the hammer.
Step 4: Tighten the flange
Use the socket wrench to tighten the bolts connecting the brass ring to the flange and securing it to the floor.
Tip
Tighten the bolts a little bit at a time to evenly force the rubber gasket downward.
Step 5: Insert closet bolts and wax ring
Insert closet bolts into the slots on either side of the flange. Then press a new wax ring over the flange to prevent water and sewer gas from leaking out.
Step 6: Replace the toilet
Set the toilet on top of the flange, making sure the closet bolts line up with and come through the holes in the base of the toilet. Put a white plastic base, a brass washer, and a hex nut onto each bolt, tightening the nuts with your socket wrench.
Step 7: Attach plastic bolt covers
Snap the plastic covers over the exposed closet bolts, reconnect the water supply, and flush the toilet to inspect it for leaks. Try to wiggle the toilet. If it wobbles, carefully tighten the closet bolts a little more. After making sure the toilet is sturdy, you’ll be able to sit securely without worrying about leaks or sewer gas.
Did You Know?
Toilet paper on a roll wasn’t introduced until 1880.
Please read the following notes, and especially the section about safety.
This is the simplest type of “ball/sphere and socket” method to fix/aim mirrors of a solar array. They can either be set as either fixed with glue, or variable with other means such as velcro straps, etc. This ball and socket method does not involve “ganged – mechanically connected / in unison” methods for aiming the mirrors; which then require motors. Motors increases the cost and complexity.
Besides for a single mirror as shown in the video, this is also good for an enhanced solar energy system if you use multples (an “array”) of this and combine the total energy from each mirror at the receiver, or even several receivers/different targets, it depends on your needs. Just fix them all (partial sphere with a flat mirror fixed/glued to a flat side of that sphere) so that they reflect the sunlight at the same thing, then that will get hot because there will be more solar (Sun) energy in one position. Use glue, perhpas silicone, to keep the mirror and partial sphere from falling out of the support structure or loosing its set alignment.
Using just silicone on a flat board to fix mirrors is ok, but as the mirrors grow in size (say over 1.5 inches on each side), this becomes a clumsy and unsafe method. The mirrors should not be too big either for this type of mount, perhaps up to 8 inches on a side only.
You can purchase spheres; perhaps wooden or plastic balls (like ping-pong balls, or styrofoam “craft” balls), but I guess you also can make them out of baked clay shells or hard plaster type materials. I guess it is possible to make 2 half (50%) spheres from one complete sphere.
The support structure should be made to be moveable, maby on some wheels, or just lifted onto some wooden turntable or blocks, so that the reflection from the Sun can be set to desired position. Another idea is a “stand” where you can perhaps tilt the support structure and tighten with some handknob screws. Height can also be adjusted if made to do so.
In the diagram in the video I mentioned that the sphere must be greater than 50% (less than 100% is obviously understood since there needs to be a flat area on the sphere to fix/glue the mirror to). I rethought this over and it can be less than 50% as long as the sphere segment does not “fall through” the diameter of the support hole.
Try this out, I’d like to see some creations and cool methods of application. A practical method is with solar cooking, so try mirrors that are about 3 to 4 inches square on a side. Near the focus of this system, you can also use a director mirror to reflectfully aim the beam, say up to the bottom of a pot, pan, solar oven (baking) with a metal bottom (an internal heat radiator would be wonderful here, or bake a solar thin crust pizza nice and crisp), or other cooking surface (such as a pancake/waffle griddle).
SAFETY:
When working with lots of sunlight, be sure to wear safety glasses/goggles, a welding helmet or some properly tinted window/sheild to protect your eyes.
For safety for the cook, for example, I reccomend heating a “flat plate” of which the cooking container/surface will then be placed upon. This will prevent, for example, a pan being lifted away and the intense sunlight shining on anyone doing that. Looking at the sun is bad enough, so don’t try to even think about looking at more than that as with these high energy solar energy systems. Keep people and pets from going between the mirrors and the receiver to prevent injury, so it helps to keep the distance between these two parts of the system as short as possible.
YOUR IMPROVEMENTS NEEDED:
Right now with this system I’m not interested with any “solar tracking methods” as with standard heliostats, but am more interested in low cost user friendly/do-it-yourself type of constructions. One thing that is needed for a future enhancement is a cheap and easy method to set each sphere (when not glueing them into fixed positioin) into position by hand; perhaps some type of screws, rubberbands, etc so that enough pressure can hold the sphere into position in possible high wind conditions. For example a shell segment of similar diameter to the partial sphere can be made to press against the ball with some pressure and an optional arrangement for this is to set the partial sphere into position from the “back side” of the support structure. I’m thinking velcro type fasteners is a simple solution. There is good room for participatorial improvements to this system.
Perhaps using the Sun to set up a fixed focus system is not such a great idea since it will be “moving” and you will be moving the mirror system. A good way to set up each mirror might be to hang a light at approximately the same altitude as the sun and use that. Setting up the system can still be done though using the Sun. Perhaps covering previously aimed mirrors is a good idea.