A563M 10S Heavy Hex Nuts Price - Brass Copper Set Screw Cup Point Grub Screws – Dingshen Metalworks
Short Description:
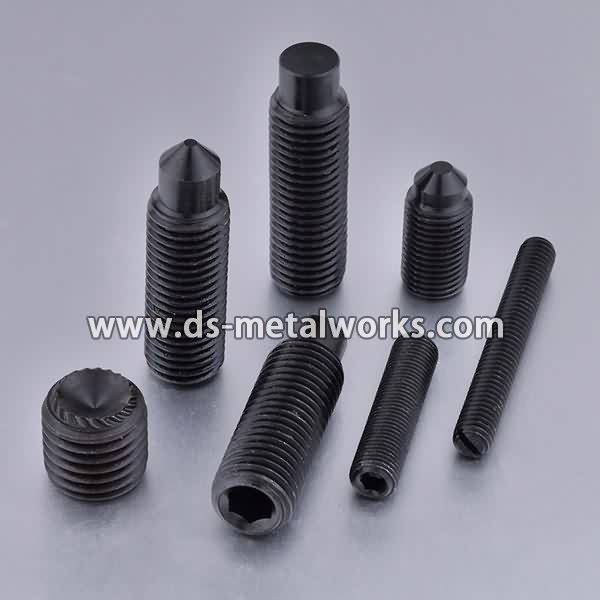
Brass Copper Set Screw Grub Screws Metric Size: M1.4 – M52, Inch Size: 0# – 2″ Hexagon Socket(Allen), Torx Star, Square, Slotted Drive Types Flat Point, Cup Point, Cone Point, Dog Point Other Drive and Point Type are also available acc. to customer requirement Various Surface Finishes Various Material Grades are available Please feel free to contact us for more details
Product Detail
Product Tags
A563M 10S Heavy Hex Nuts Price - Brass Copper Set Screw Cup Point Grub Screws – Dingshen Metalworks Detail:
Brass Copper Set Screw Grub Screws
Metric Size: M1.4 – M52, Inch Size: 0# – 2″
Hexagon Socket(Allen), Torx Star, Square, Slotted Drive Types
Flat Point, Cup Point, Cone Point, Dog Point
Other Drive and Point Type are also available acc. to customer requirement
Various Surface Finishes
Various Material Grades are available
Please feel free to contact us for more details
Product detail pictures:


Our items are commonly identified and trusted by customers and may fulfill continuously switching economic and social wants of A563M 10S Heavy Hex Nuts Price - Brass Copper Set Screw Cup Point Grub Screws – Dingshen Metalworks, The product will supply to all over the world, such as: Kenya, Croatia, Australia, Honest to every customers are our requested! First-class serve, best quality, best price and fastest delivery date is our advantage! Give every customers good serve is our tenet! This makes our company get the favour of customers and support! Welcome all over the world customers send us enquiry and looking forward your good co-operation !Please your inquiry for more details or request for dealership in selected regions.
See PART 1 first. https://www.youtube.com/watch?v=I6Zroukw5lo
This is PART 2.
Part I is a video on “how to make your own heli stand” for further reference.
Novice to Helis, Jeff Martin, feels the exhilaration of spinning up and feeling the controls of Dave’s Blade 400 on his homemade Helicopter training/test stand.
This is what happened and his reaction.
Again, all helis are “upside down rotary lawnmowers”, so respect this test stand for what it is.
Be careful on the controls and do not abruptly make changes, or you may have a blade strike or something worse.
If you break it on the stand, you would most likely have also broken it OFF the stand too.
Hope this type of device will help you learn faster and easier. Good Luck.
Heli Test/training stand. by Dave Herbert.
Parts Required:
1, 24″x 24″ plywood to make base circle.
1, 24 ” long by 2×2″ wide foam insulator strip (cut to 2x2x2″ squares
1, ¼ x 21″ round Ramin Wood sliding rod.
1, ¾” x 24″ threaded galvanized pipe (Needs to be heavy), so the reason.
1, ¾” floor flange with 4, 1 ½”x 3/16″ long nuts and bolts to attach it to Ply base.
1, 3/8″ x 2 ½” Stove bolt (round head, no slots), 2 large 3/8″ washers and 2 3/8″ Nuts
2, 3 ½” long x ¾” wide, light weight compression springs
1, ½” Long x 1/8″ wood screw
1, 5/16 small holed (1/4″) washer for spring contact point on the bottom of the rod.
1, 3″x 8″ x 3/16″ ply or other strong material for helicopter base mounting plate.
2, ¾” Hose clamps for Ramin wood rod.
1, 1″ Hose clamp for galvanized pipe
1, ¼” x 2 ½ ” long Flat Headed shoulder bolt for holding mounting plate to Ramin rod
1, 12″ long mini bungee cord
8, # 60 rubber bands, 4 each side to mount heli landing gear to plate.
1, 12″ long nylon “chalk” string to make safety harness. Loop over heli frame and mounting plate.
Take your time and follow these instructions carefully.
1. Measure for exact center of the 24″x24″ Plywood base and cut out as large a circle as there is wood. Sand and paint or stain as desired.
2. Drill out the center hole to 3/8″ and bolt in the 3/8″ x 2 ½” stove bolt, (round head down towards floor). Use wide washers and nuts on both sides to adjust the length on the bottom to be 1 ½” out from wood, if using 2 x 2 x 2″ foam blocks.
3. Cut foam then mark 8 even locations on the bottom using an analog clock to guide you. Glue them on with silicone or electric glue as shown in the video.
4. Bolt on the ¾” threaded floor flange directly centered over the Stove bolt, making sure it is absolutely centered.
5. Drill 3/16″ hole, 3″ from the bottom of the 3 /4″ pipe and put in same size nut and bolt and lock washer. The springs rest on this.
6. Screw pipe onto flange, hand tight. Leave the plastic thread protector on the top end. Now the base and Guide Pipe are standing vertically and all should be level and be able to wobble slightly.
7. Drop the 2 springs into the pipe.
8. Cut or fabricate your heli mounting plate from 3/16th ” Ply or other. (3″x8″)
9. Find exact center of this plate and drill a 3/8th ” hole. Measure twice, drill once!
10. Cut Ramin wood dowel to 21″ long, put a ¾” small hose clamp on one end, and make it snug. Then carefully drill a ¼” hole down the center of the rod, 2″ deep.
11. On the other end of the rod, drill a small 1/8th ” pilot hole and screw on the 5/16 ” spring contact washer with the small screw.
12. Drop the 1/1/2″ hose clamp onto the guide pipe, leaving it loose.
13. Now using the Flat headed shoulder bolt, put it through the hole in the mounting plate and thread it into the end of your Ramin Wood rod with the hole. Screw it in so it remains 1″ above the plate. The plate should slide up and down freely and have just a bit of slop to give your helicopter a 15 degree lean in any direction.
Now tighten the smaller hose clamp around the end to keep the wood rod from splitting.
14. Place the second ¾” hose clamp on the rod and just snug it up somewhere near the top one near the mounting plate.
15. Put some petroleum jelly on the other end with the washer and drop the rod into the galvanized pipe. It should spring up and down freely. An extra spring may be necessary for a heavier helicopter.
16. Now mount the small bungee cord to the large hose clamp and tightened it about 1 inch below the threaded end at the top. Make sure it is tight.
17. Attach the other end of the bungee cord to the smaller hose clamp on the rod and adjust the length so the heli can raise no more than 8 inches, and tighten that clamp and bungee hook around the Ramin Rod.
18. Make sure it springs up and down freely and the rod cannot come out the end of the guide pipe, which is the bungee cord’s job.
Finished. Any questions, refer to my video Part I.
Good luck.