Big discounting ASTM A194 4 Heavy Hex Nuts for British Importers
Short Description:
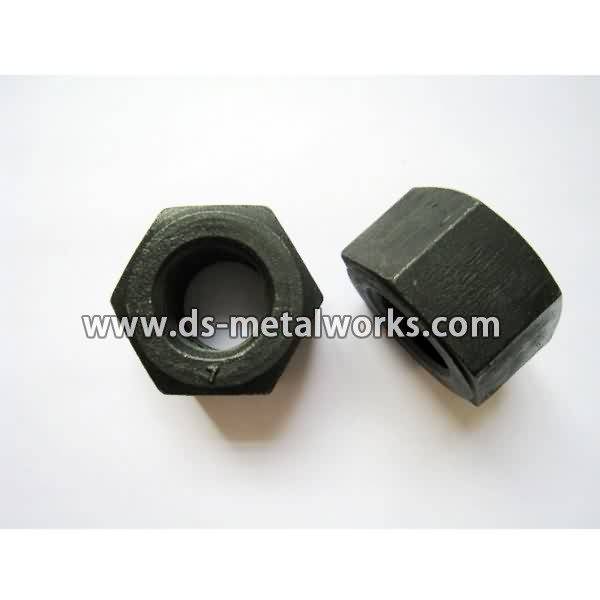
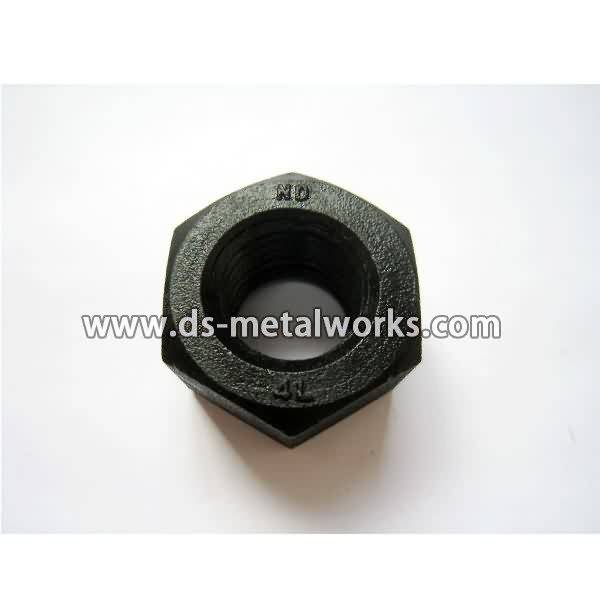
ASTM A194/A194M 4 Heavy Hex Nuts API 6A Flange Valve Wellhead Heavy Hex Nuts Dimension Standard: ASME B18.2.2, ASME B18.2.4.6M, ISO 4033, Din934 H=D Inch Size: 1/4”-4” with various lengths Metric Size: M6-M100 with various lengths Other Available Grade: ASTM A194/A194M 2H, 2HM, 4, 4L, 7, 7L, 7M, 8, 8M, 16 and so on. Finish: Plain, Black Oxide, Zinc Plated, Zinc Nickel Plated, Cadmium Plated, PTFE etc. Packing: Bulk about 25 kgs each carton, 36 cartons each pallet Advantage: High Quality, Comp...
Product Detail
Product Tags
Big discounting ASTM A194 4 Heavy Hex Nuts for British Importers Detail:
ASTM A194/A194M 4 Heavy Hex Nuts
API 6A Flange Valve Wellhead Heavy Hex Nuts
Dimension Standard: ASME B18.2.2, ASME B18.2.4.6M, ISO 4033, Din934 H=D
Inch Size: 1/4”-4” with various lengths
Metric Size: M6-M100 with various lengths
Other Available Grade:
ASTM A194/A194M 2H, 2HM, 4, 4L, 7, 7L, 7M, 8, 8M, 16 and so on.
Finish: Plain, Black Oxide, Zinc Plated, Zinc Nickel Plated, Cadmium Plated, PTFE etc.
Packing: Bulk about 25 kgs each carton, 36 cartons each pallet
Advantage: High Quality, Competitive Price, Timely Delivery,Technical Support, Supply Test Reports
Please feel free to contact us for more details.
Product detail pictures:
Adhering into the basic principle of quality, assistance, effectiveness and growth, we have attained trusts and praises from domestic and worldwide client for Big discounting ASTM A194 4 Heavy Hex Nuts for British Importers, The product will supply to all over the world, such as: Morocco, kazan, Suriname, With well educated, innovative and energetic staff, we are responsible for all elements of research, design, manufacture, sale and distribution. By studying and developing new techniques, we are not only following but also leading fashion industry. We listen attentively to the feedback from our customers and provide instant replies. You will instantly feel our professional and attentive service.
RATTAN INDUSTRIES (INDIA) has achieved specialization in manufacturing and export of Railway Fasteners, Railway Bolts Nuts Fasteners, Road Crash Barrier Fasteners, High Tensile Hex Bolts, High Tensile Hex Nuts, Anchor Foundation Bolts / U Bolts, Eye Bolts / Forged Eye Bolts, T Bolts / J Bolts / L Bolts, Hot Forging Items, Railway Electrical Fasteners, Threaded Rods / Thread Bars, Threaded Studs, Hot Forging Fasteners etc. we are also manufacturer exporters suppliers of all other Hot Forging Companies in India, Hot Forging Components, Hot Forging Products, Hot Forging items, Automobile Parts Forging, Tractor Parts Forging, Automotive parts Forgings, Agriculture Parts Forgings, Fasteners Forgings, Steel Components Forgings, Forged Nuts Bolts, Forged Flanges, Forged Agriculture Implements, Customized Forgings, Forged Bolts Nuts in india, ludhiana punjab usa, uk, America, UAE Dubai, australia, italy, canada https://www.rattaninds.com contact number +9195925-42700, +91-92161-34270 rattaninds@gmail.com, info@rattaninds.com
EverLog Concrete Log Siding Installation by EverLog Systems – https://www.everlogs.com/everlog-concrete-log-siding/
Transcript:
Welcome to EverLog Systems, the best way to build a log and timber home.
This video is a basic introduction on installing EverLog Siding, which is a revolutionary engineered concrete siding product used in both renovations and new construction.
EverLog Siding is maintenance free; light weight; fire resistant; resistant to mold and other decay; resistant to insects; easy to install with common tools and screws; and provides a variety of other benefits
Installation of our EverLog siding is simple and can be completed by any contractor or do-it-yourselfer. In conjunction with our installation guide, this video will show you just how easy installation can be.
EverLog Siding comes pre-finished and is packaged in durable crates. A forklift is required to unload crates from the trailer. Contact EverLog Systems for crate weight and forklift recommendations, Also reference our EverLog Siding crate handling and siding removal instruction manual. The crates should be placed on level ground with 2×4 blocks under the front to provide a slight tilt from front to back.
Partially remove top screws using T-30 bit included with delivery, carefully set lid aside. Partially remove front scr3ews on both right and left end panels, fully remove screws from front bottom front panel and reserve for re-assembly. Carefully lay front panel down.
Using two people carefully tilt siding up and lift on edge, always carry panels on edge. Place packaging foam in a safe place until crate is empty at which point the foam can be placed back into the crate before closing crate up in reverse order of disassembly. Crates containing corners or other custom components may have additional bulkhead screws that need removed prior to removing face panel.
Installation requires a few common tools. A four and one-half inch electric angle grinder and accompanying four and one-half inch masonry blade is recommended for most if not all cutting. A hole-saw may also be needed for round cuts such as dryer vents or plumbing penetrations. A high-speed cordless drill or two with extra batteries is also recommended. EverLog Systems recommends using GRK Cabinet® Screws along with the companion HSS Bit Holder, also made by GRK to ease installation.
As with any construction task, proper safety and protection equipment such as safety eye and ear protections, respirators and gloves should be used at all times when handling and cutting concrete materials.
Prior to installing any siding, outside and inside corners need to be installed first. Our corner posts come in stock ten-foot lengths so most corners will need to be cut to fit on site prior to their installation. After measuring the short and long lengths, mark the corner with a speed square with the length or angles needing to be cut. Care should be taken when planning cuts and strap locations. The angles can then be cut using the angle grinder.
Once the corner is cut and fits nicely, unfold the embedded installation straps and securely fasten the corners to the wall using two screws per strap.
After cutting and installing corners you’re ready to begin horizontal siding installation. Install and secure HSS Bit Holder into the drill, refer to GRK instructions for the bit holder’s adjustment instructions. Place Cabinet® screw onto bit holder and press against panel flange, the magnetic bit holder will secure the screw during driving.
Using a high speed setting, drive the self-tapping screw into the center of the flange, a minimum of two inches from the end. Speed should be reduced just before setting screw snugly against the siding flange taking care not to over-tighten. Repeat process taking care to hit the stud locations. Panels should be spaced one eighth inch apart end to end and end to corners to allow for expansion and contraction. All butt joints should be factory end to factory end with cuts placed against corners or other trim.
Cutting Siding
Because EverLog Siding comes in stock twelve-foot lengths it will need to be cut to fit. Measure length of siding needed, again allowing for one eights inch gaps on ends. Mark length needed on siding, a template tool can be made to automate markings for square or pitched cuts. Mark the siding with a clearly visible line. Place blocking under the siding to allow four and one-half inch masonry blade to penetrate through the siding. Once safety equipment is in place and clear of obstructions, begin cutting siding. Hold the angle grinder securely and parallel to the cut, after cutting brush dust from the surface of the siding using a soft bristled nylon brush. Each profile of siding is cut using similar methods.
Please call EverLog Systems at 877.257.5647 with any questions and refer to our siding installation guide at https://www.everlogs.com/everlog-siding-brochures-technical-information/.