Bottom price for ASTM A193 B7 Heavy Hex Bolts Export to Iceland
Short Description:
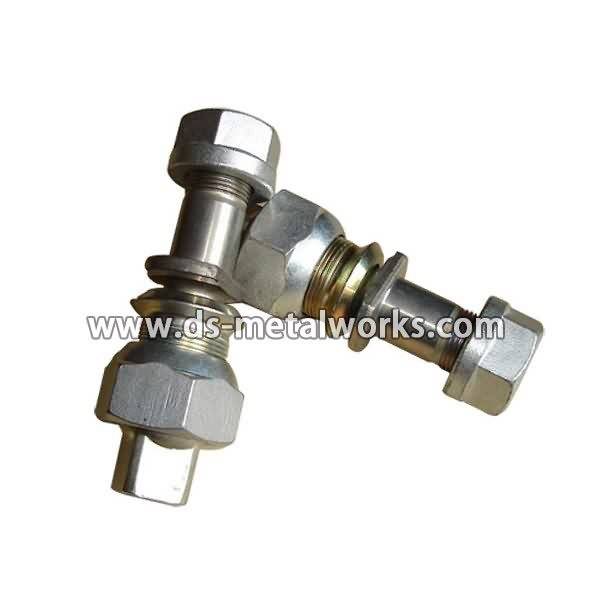
A193 B7 Heavy Hex Bolts Heavy Hex Cap Screws Standard: ASME/ANSI B18.2.1, ASME/ANSI B18.2.3.7M (Various types of head are available) Inch Size: 1/2”-2.3/4” with various lengths Metric Size: 1/2-M72 with various lengths Grade: ASTM A193 B7 Finish: Black Oxide, Zinc Plated, Zinc Nickel Plated, PTFE etc. Packing: Bulk about 25 kgs each carton, 36 cartons each pallet Advantage: High Quality and Strict Quality Control, Competitive Price,Timely Delivery; Technical Support, Supply Test Reports Pleas...
Product Detail
Product Tags
Bottom price for ASTM A193 B7 Heavy Hex Bolts Export to Iceland Detail:
A193 B7 Heavy Hex Bolts Heavy Hex Cap Screws
Standard: ASME/ANSI B18.2.1, ASME/ANSI B18.2.3.7M
(Various types of head are available)
Inch Size: 1/2”-2.3/4” with various lengths
Metric Size: 1/2-M72 with various lengths
Grade: ASTM A193 B7
Finish: Black Oxide, Zinc Plated, Zinc Nickel Plated, PTFE etc.
Packing: Bulk about 25 kgs each carton, 36 cartons each pallet
Advantage: High Quality and Strict Quality Control, Competitive Price,Timely Delivery; Technical Support, Supply Test Reports
Please feel free to contact us for more details.
Product detail pictures:

It is actually our accountability to satisfy your needs and effectively serve you. Your pleasure is our best reward. We're on the lookout forward for your stop by for joint growth for Bottom price for ASTM A193 B7 Heavy Hex Bolts Export to Iceland, The product will supply to all over the world, such as: Naples, Durban, Tanzania, Our company regards reasonable prices, efficient production time and good after-sales service as our tenet. We hope to cooperate with more customers for mutual development and benefits. We welcome potential buyers to contact us.
https://clublexus.com/how-tos is the leading Lexus IS, RX, ES, and GS resource for technical DIY guides. Replacing the thermostat in your Lexus RX is an important maintenance item that ensures your engine runs properly and the components don’t overheat. For the full step-by-step article, please visit https://www.clublexus.com/how-tos/a/lexus-rx-how-to-replace-thermostat-366260
An overheating engine can be one of the most damaging conditions a car will experience. When the engine runs too hot, the seals and gaskets around key components can warp and fail. A faulty thermostat can force the engine to overheat by preventing coolant from flowing through the radiator. Fixing and replacing a faulty one is easy and will save a considerable amount of time and money compared to leaving the job to a mechanic.
This moderately difficult job takes two to three hours and costs around $25 to complete, compared to the professional repair cost of $120 to $170.
This job requires a jack and jack stands, a torque wrench, a 5 millimeter bi-hexagon wrench, a socket wrench, a ratchet, a 13 inch extension, an 8 inch extension, a cheater bar, a bucket or catch pan, a flat head screwdriver, coolant, and a new thermostat.
Step One – Remove the serpentine belt
In order to access the thermostat on the Lexus RX, you must remove the serpentine belt first.
Jack up the front end, remove the passenger side front wheel, then remove the panels from the fender well. Loosen the belt tensioner with a socket wrench, and place a 5 millimeter bi-hexagon wrench through the bottom hole. Pull the belt from the pulleys.
Step Two – Locate the thermostat
Most thermostats are located where the radiator hose goes into the engine, and the RX isn’t any different. Follow the upper radiator hose to the engine block, which connects to the engine’s water inlet. In that pipe is the thermostat. In order to remove the thermostat, that pipe will have to come out.
Step Three – Place bucket under where you’re working
Removing a thermostat or radiator hose will cause a lot of coolant to be spilled. Place a bucket underneath the connectors to minimize the mess.
Step Four – Remove the number two idler pulley
The idler pulley is located underneath the water inlet. You’ll need to remove this pulley in order to remove the water inlet, otherwise it’ll block access to the bolts securing the inlet. Wedge a screwdriver between the pulley and the engine or water inlet to keep the pulley from spinning. Unbolt it with a long socket wrench.
Step Five – Remove water inlet
The upper radiator hose will likely be strapped to the water inlet via a clamp. Take a flat head screwdriver and loosen the clamp. Once the clamp is loosened, pull the hose off the water inlet. This will reveal the two bolts holding the thermostat in place. Remove these bolts and pull off the water inlet to expose the thermostat.
Step Six – Remove thermostat bolts
Remove the thermostat and be sure to remove the gaskets as well. Clean the new gasket seats of the replacement thermostat while making sure no rubber crumbles off or gets dropped into the engine.
Step Seven – Replace the thermostat
Once the thermostat seat is cleaned, replace the new thermostat and gasket, securing it with the bolts originally removed.
Step Eight – Replace the hose, clamp, and fluid, and clean up
Once the thermostat has been replaced, re-install the water inlet. Slip the radiator hose back onto the inlet and secure the clamp as it was before you started. Once secure, take the fluid that spilled into the recovery bucket and add it back to the radiator. Be sure to mop up any spilled fluid as it can be deadly if accidentally ingested by animals.
Chuyên sản xuất: KIM THU SÉT CỔ ĐIỂN/CỌC TIẾP ĐỊA KUMWELL/TY REN/TY TREO/TY RĂNG/THANH REN/ TY TREO mạ kẽm M6, M8, M10, M12, M16 – (High quality Galvanized Thread Rod) 1m, 2m, 3m, đạt tiêu chuẩn JIS B 1051 – JAPAN & DIN 975 & DIN 976- Đức, Đai treo /Cùm treo, Đai treo 2 mảnh (Pipe hanger/Conduit Clamp), tắc kê đạn, Đai treo Omega, cùm omega, Cùm Ubolt, Cùm Ubolt lá (U Bolts) Gía đỡ cơ điện (M&E/Mechanical Fixings, Fasteners and Spring steel Supports) Cùm treo ống / Kẹp treo ty & ống / Kẹp treo ống thép luồn dây điện, ống PCCC/ HVAC (Steel conduit hanger/Pipe hanger/Clevis Hanger), Kẹp xà gồ/ Kẹp dầm thép (Beam Clamp/Suspending Clamp/C-Clamp), Thanh chống đa năng (Unistrut Channel/ Strut/ C-Channel/ Double Unistrut profile ), Đai ốc lò xo cho thanh chống đa năng (Long spring nut), Tay đỡ đơn (Cantilever Arm), U cùm ( U bolts), Tắc kê đạn (Drop In Anchor), Đai treo (bát treo) cho hệ thống điện nhẹ M&E / HVAC/PCCC /Điều hoà không khí cho toà nhà cao tầng và nhà máy sản xuất công nghiệp tại Việt Nam.
Mọi thông tin chi tiết về sản phẩm của Cát Vạn Lợi, xin quý khách hàng vui lòng liên hệ: 1900 5555 49
CÔNG TY TNHH THIẾT BỊ ĐIỆN CÔNG NGHIỆP CÁT VẠN LỢI
VPGD : 61 Đường số 7, KDC CityLand Center Hills, P. 7, Q. Gò Vấp, TPHCM
Tel: 08-35886496/ 22 46 46 99
Fax: 08-35886505
E-mail: baogia@catvanloi.com
Website: WWW.CATVANLOI.COM –
https://ongluondaydienvietnam.wordpress.com/ https://coctiepdiakumwell.com https://coctiepdiakumwell.net
Youtube: WWW.CATVANLOI.COM
Facebook: WWW.CATVANLOI.COM
Phòng chăm sóc khách hàng: 0943353039 (Mr.Tâm)