
BS4395 friction grip bolts Price - ASTM A194 7 Heavy Hex Nuts – Dingshen Metalworks
Short Description:
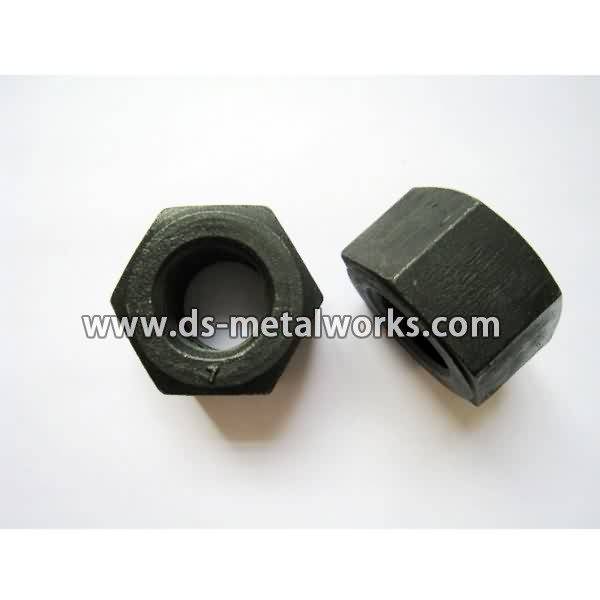
ASTM A194/A194M 7 Heavy Hex Nuts API 6A Flange Valve Wellhead Heavy Hex Nuts Dimension Standard: ASME B18.2.2, ASME B18.2.4.6M, ISO 4033, Din934 H=D Inch Size: 1/4”-4” Metric Size: M6-M100 Other Available Grade: ASTM A194/A194M 2H, 2HM, 4, 4L, 7, 7L, 7M, 8, 8M, 16 and so on. Finish: Plain, Black Oxide, Zinc Plated, Zinc Nickel Plated, Cadmium Plated, PTFE etc. Packing: Bulk about 25 kgs each carton, 36 cartons each pallet Advantage: High Quality, Competitive Price, Timely Delivery,Technical S...
Product Detail
Product Tags
BS4395 friction grip bolts Price - ASTM A194 7 Heavy Hex Nuts – Dingshen Metalworks Detail:
ASTM A194/A194M 7 Heavy Hex Nuts
API 6A Flange Valve Wellhead Heavy Hex Nuts
Dimension Standard: ASME B18.2.2, ASME B18.2.4.6M, ISO 4033, Din934 H=D
Inch Size: 1/4”-4”
Metric Size: M6-M100
Other Available Grade:
ASTM A194/A194M 2H, 2HM, 4, 4L, 7, 7L, 7M, 8, 8M, 16 and so on.
Finish: Plain, Black Oxide, Zinc Plated, Zinc Nickel Plated, Cadmium Plated, PTFE etc.
Packing: Bulk about 25 kgs each carton, 36 cartons each pallet
Advantage: High Quality, Competitive Price, Timely Delivery,Technical Support, Supply Test Reports
Please feel free to contact us for more details.
Product detail pictures:
Fast and great quotations, informed advisers to help you choose the correct product that suits all your preferences, a short creation time, responsible top quality control and different services for paying and shipping affairs for BS4395 friction grip bolts Price - ASTM A194 7 Heavy Hex Nuts – Dingshen Metalworks, The product will supply to all over the world, such as: Las Vegas, Denmark, Ireland, Please feel cost-free to send us your specifications and we'll respond to you asap. We've got a professional engineering team to serve for the every single detailed needs. Free samples may be sent for you personally to know far more facts. So that you can meet your desires, please really feel cost-free to contact us. You could send us emails and call us straight. Additionally, we welcome visits to our factory from all over the world for much better recognizing of our corporation. nd merchandise. In our trade with merchants of several countries, we often adhere to the principle of equality and mutual advantage. It is our hope to market, by joint efforts, both trade and friendship to our mutual benefit. We look forward to getting your inquiries.
Chuyên sản xuất: KẸP C/ KẸP XÀ GỒ GANG/TY REN/TY TREO/TY RĂNG/THANH REN/ TY TREO mạ kẽm M6, M8, M10, M12, M16 – (High quality Galvanized Thread Rod) 1m, 2m, 3m, đạt tiêu chuẩn JIS B 1051 – JAPAN & DIN 975 & DIN 976- Đức, Đai treo /Cùm treo, Đai treo 2 mảnh (Pipe hanger/Conduit Clamp), tắc kê đạn, Đai treo Omega, cùm omega, Cùm Ubolt, Cùm Ubolt lá (U Bolts) Gía đỡ cơ điện (M&E/Mechanical Fixings, Fasteners and Spring steel Supports) Cùm treo ống / Kẹp treo ty & ống / Kẹp treo ống thép luồn dây điện, ống PCCC/ HVAC (Steel conduit hanger/Pipe hanger/Clevis Hanger), Kẹp xà gồ/ Kẹp dầm thép (Beam Clamp/Suspending Clamp/C-Clamp), Thanh chống đa năng (Unistrut Channel/ Strut/ C-Channel/ Double Unistrut profile ), Đai ốc lò xo cho thanh chống đa năng (Long spring nut), Tay đỡ đơn (Cantilever Arm), U cùm ( U bolts), Tắc kê đạn (Drop In Anchor), Đai treo (bát treo) cho hệ thống điện nhẹ M&E / HVAC/PCCC /Điều hoà không khí cho toà nhà cao tầng và nhà máy sản xuất công nghiệp tại Việt Nam.
Mọi thông tin chi tiết về sản phẩm của Cát Vạn Lợi, xin quý khách hàng vui lòng liên hệ: 1900 5555 49
CÔNG TY TNHH THIẾT BỊ ĐIỆN CÔNG NGHIỆP CÁT VẠN LỢI
VPGD : 61 Đường số 7, KDC CityLand Center Hills, P. 7, Q. Gò Vấp, TPHCM
Tel: 08-35886496/ 22 46 46 99
Fax: 08-35886505
E-mail: baogia@catvanloi.com
Website: WWW.CATVANLOI.COM –
https://ongluondaydienvietnam.wordpress.com/
Youtube: WWW.CATVANLOI.COM
Facebook: WWW.CATVANLOI.COM
Phòng chăm sóc khách hàng: 0943353039 (Mr.Tâm)
How to remove rear wheel sprocket cush bushings on a Yamaha RD. Using simple tools you can see how much easier this process is instead of using a Dremel to cut them out.
Tools Needed:
Tap: 1/2″x13nc
Ratchet & 3/4″ socket
All-thread 1/2″x13x6″ double nut on one end, or 1/2′x13x6″ Grade 8 Bolt (Better)
Threading Oil
WD40
Propane torch
Notes on what I found in the process:
After removing all 4 bushings, the hub temperature was less than 150 degrees fahrenheit, as measured in the last bushing well closest to the bearings and seals.
After removing the 3rd bushing the threads on the all-thread were so rounded that it wouldn’t extract the 4th bushing. I cut off about 3″s of damaged thread, and was then able to extract the last one. Long story short…. use a higher grade material!
Thanks for watching,
Jim
UPDATE: 02/08/14
Finally got around to installing the new sprocket cush bushings in my RD400 hub. It was real easy and I used the same procedure to install the new wheel bearings. I sourced a Single Burner Electric Hot Plate from Target for about $12.00. I placed the hub on the hot plate and used the thermometer in my video to monitor how hot the hub got. I also placed the new cush bushing and wheel bearing in the freezer. Once the hub got up to about 130 degrees, I dropped the frozen cush bushings into the holes. They went right in without any force required. I did use a socket and tap on them to make sure they were fully seated, which they were. Did the same process for the wheel bearings, and the fell right in. Tapped on them also to make sure they were fully seated, which they were.
Note: When I installed the wheel bearings, I heated the hub up on one side facing the hot plate, removed from hot plate and installed that bearing. I them turned the hub over and placed it back on the hot plate to warm the other side, removed from the hot plate and installed the other bearing. Just make sure there are no burrs on the top edge of the cush bushing holes or wheel bearing holes. They should have a slight chamfer on the top facing edge to facilitate a smooth install.
UPDATE: 10/28/14
To prevent the first bearing from falling out when you flip the hub over to install the second bearing, place a large diameter socket on your workbench, which will be a spacer between the first bearing and the bench. This will keep the first bearing seated while you install the second bearing. Also, I found that I only needed to set my hotplate on low to get the required expansion.
Jim


