EN14399 Structural Nuts Price - ASTM A320 L7 All Threaded Stud Bolts – Dingshen Metalworks
Short Description:
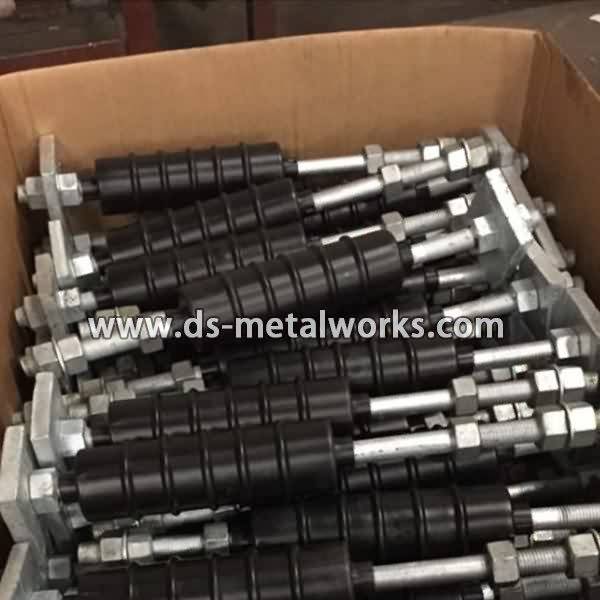
ASTM A320/A320M L7 All Threaded Stud Bolts Alloy steel bolting for pressure vessels, valves, flanges, and fittings for low-temperature service. Standard: IFI-136, ASME B16.5, DIN976 Inch Size: 1/4”-2.1/2” with various lengths Metric Size: M6-M64 with various lengths Other Available Grade: ASTM A193/A193M B7, B7M, B16 B8 Class 1 & 2, B8M Class 1 & 2, ASTM A320/A320M L7, L7M, L43, B8 Class 1 & 2, B8M Class 1 & 2, and so on. Finish: Plain, Black Oxide, Zinc Plated, Zinc Nickel Pl...
Product Detail
Product Tags
EN14399 Structural Nuts Price - ASTM A320 L7 All Threaded Stud Bolts – Dingshen Metalworks Detail:
ASTM A320/A320M L7 All Threaded Stud Bolts
Alloy steel bolting for pressure vessels, valves, flanges, and fittings for low-temperature service.
Standard: IFI-136, ASME B16.5, DIN976
Inch Size: 1/4”-2.1/2” with various lengths
Metric Size: M6-M64 with various lengths
Other Available Grade:
ASTM A193/A193M B7, B7M, B16 B8 Class 1 & 2, B8M Class 1 & 2,
ASTM A320/A320M L7, L7M, L43, B8 Class 1 & 2, B8M Class 1 & 2, and so on.
Finish: Plain, Black Oxide, Zinc Plated, Zinc Nickel Plated, Cadmium Plated, PTFE etc.
Packing: Bulk about 25 kgs each carton, 36 cartons each pallet
Advantage: High Quality and Strict Quality Control, Competitive Price,Timely Delivery; Technical Support, Supply Test Reports
Please feel free to contact us for more details.
Product detail pictures:


we can easily offer you high-quality products and solutions, competitive rate and very best shopper support. Our destination is You come here with difficulty and we give you a smile to take away for EN14399 Structural Nuts Price - ASTM A320 L7 All Threaded Stud Bolts – Dingshen Metalworks, The product will supply to all over the world, such as: Germany, Auckland, Latvia, With its rich manufacturing experience, high-quality products, and perfect after-sale service, the company has gained good reputation and has become one of the famous enterprise specialized in manufacturing series.We sincerely hope to establish business relation with you and pursue mutual benefit.
My advice is this: Settle! That’s right. Don’t worry about passion or intense connection. Don’t nix a guy based on his annoying habit of yelling “Bravo!” in movie theaters. Overlook his halitosis or abysmal sense of aesthetics. Because if you want to have the infrastructure in place to have a family, settling is the way to go. Based on my observations, in fact, settling will probably make you happier in the long run, since many of those who marry with great expectations become more disillusioned with each passing year. (It’s hard to maintain that level of zing when the conversation morphs into discussions about who’s changing the diapers or balancing the checkbook.)
Obviously, I wasn’t always an advocate of settling. In fact, it took not settling to make me realize that settling is the better option, and even though settling is a rampant phenomenon, talking about it in a positive light makes people profoundly uncomfortable. Whenever I make the case for settling, people look at me with creased brows of disapproval or frowns of disappointment, the way a child might look at an older sibling who just informed her that Jerry’s Kids aren’t going to walk, even if you send them money. It’s not only politically incorrect to get behind settling, it’s downright un-American. Our culture tells us to keep our eyes on the prize (while our mothers, who know better, tell us not to be so picky), and the theme of holding out for true love (whatever that is—look at the divorce rate) permeates our collective mentality.
Even situation comedies, starting in the 1970s with The Mary Tyler Moore Show and going all the way to Friends, feature endearing single women in the dating trenches, and there’s supposed to be something romantic and even heroic about their search for true love. Of course, the crucial difference is that, whereas the earlier series begins after Mary has been jilted by her fiancé, the more modern-day Friends opens as Rachel Green leaves her nice-guy orthodontist fiancé at the altar simply because she isn’t feeling it. But either way, in episode after episode, as both women continue to be unlucky in love, settling starts to look pretty darn appealing. Mary is supposed to be contentedly independent and fulfilled by her newsroom family, but in fact her life seems lonely. Are we to assume that at the end of the series, Mary, by then in her late 30s, found her soul mate after the lights in the newsroom went out and her work family was disbanded? If her experience was anything like mine or that of my single friends, it’s unlikely.
And while Rachel and her supposed soul mate, Ross, finally get together (for the umpteenth time) in the finale of Friends, do we feel confident that she’ll be happier with Ross than she would have been had she settled down with Barry, the orthodontist, 10 years earlier? She and Ross have passion but have never had long-term stability, and the fireworks she experiences with him but not with Barry might actually turn out to be a liability, given how many times their relationship has already gone up in flames. It’s equally questionable whether Sex and the City’s Carrie Bradshaw, who cheated on her kindhearted and generous boyfriend, Aidan, only to end up with the more exciting but self-absorbed Mr. Big, will be better off in the framework of marriage and family. (Some time after the breakup, when Carrie ran into Aidan on the street, he was carrying his infant in a Baby Björn. Can anyone imagine Mr. Big walking around with a Björn?)
https://www.homeownerseries.com
This is video #2 of a 3-part series. The videos are:
Part 1 = https://youtu.be/8xlJXrSK3ag?hd=1
Part 2 = https://youtu.be/BLDvTRZlyCo?hd=1
Part Overview = https://youtu.be/KCPlbiTcLc4?hd=1
To watch the Flush Valve Playlist = https://www.youtube.com/view_play_list?p=31C570921B83280C
Flush Valve
Parts Needed
Before this project is started a new flush valve kit will need to be purchased at a hardware or plumbing supply store. This kit should include the flush valve assembly, which is the overflow tube and seat, seals and lock nut, flapper valve with lift chain and a sponge gasket. Additionally, a supplemental sponge gasket may need to be purchased depending on the curvature of the connection between the tank and the base. The last items that need to be purchased are new tank mounting bolts. Generally, a tank will require two or three mounting bolts so purchase enough for your given toilet.
Tools Needed
The tools necessary for this project are an adjustable open-end wrench or socket wrench, a large sponge, a flat-head screwdriver, a pair of rib-joint pliers, a cement mixing tub, a small plastic container, and possibly a mini-hacksaw.
Replacement
Before beginning this repair shut off the water supply, remove the lid to the tank, and flush the toilet. Once the tank is mostly empty, sponge out the rest of the water draining it into the toilet’s bowl. With the tank empty, position a plastic container to collect water under the water supply hose and unscrew the hose from the base of the tank, having any water drain into the plastic container below. To remove the tank, its mounting bolts will need to first be unscrewed.
Using the flat head screwdriver to hold the head of the bolt, and an adjustable open-ended wrench to loosen the nut remove all of the tank mounting bolts. If the bolts are corroded and too difficult to unscrew, cut through them with a mini-hacksaw. When the bolts are free lift the tank off of the base and place it into the cement-mixing tub.
With the tank on its side peel off the sponge gasket reveling the lock nut. While holding onto the flush valve assembly inside the tank, unscrew the lock nut from the base of the tank using a pair of rib-joint pliers.
With the assembly disconnected from the tank unhook the chain from the flush handle, and remove the old flush valve assembly. Take the new flush valve assembly insuring that its seal is in place, and insert it into the tank of the toilet with the overflow tube at the ten o’clock position. Then place the external seal on the flush valve and hand-tighten the lock nut. Finally tighten the lock nut with rib-joint pliers and affix the sponge gasket over the lock nut. Reattach the flapper valve to the overflow tube and the chain to the flush lever.
Insert the tank mounting bolts with washers back through the openings in the base of the tank, once they are in place set the tank back on the base of the toilet lining up the mounting bolts with their corresponding openings in the toilet’s bowl. Hand tighten the lock nuts on the mounting bolts and finish off using the screwdriver and socket wrench to secure the bolts water tight with no movement between the tank and the base.
Now that the tank is re-installed the mounting bolts depending on personal preference, may be trimmed within a quarter inch from the lock nut, using a mini hacksaw. Reattach the water supply hose and turn on the water supply valve. The tank should begin to fill. As the tank fills inspect the joint between the base and the tank for any leaking. Once the tank is full make any adjustment to the overflow tube, flush valve and tank fill valve for optimum water level. With all adjustments complete test cycle the toilet and replace the toilet’s tank lid.