Factory Price EN14399-4 and 8 System HV Structural nuts for South Korea Manufacturers
Short Description:
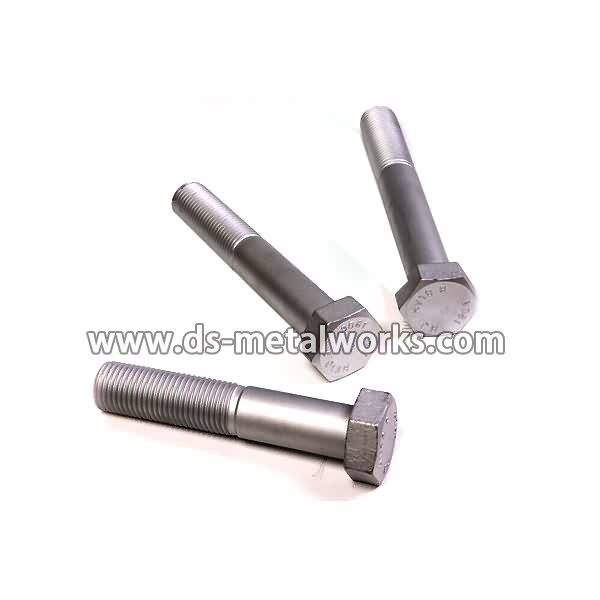
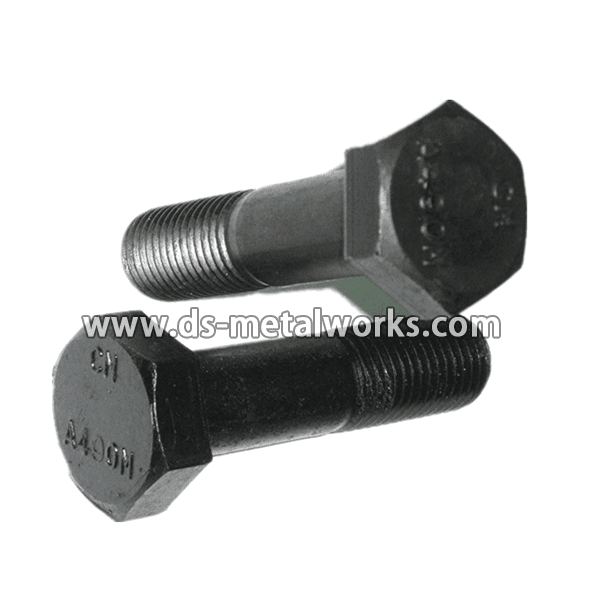
EN14399-4 and 8 System HV Structural nuts for High-Strength Structural bolting Dimension Standard: EN14399-4 and 8 Metric Size: M12-M36 Material Grade: ISO 898-2 class 10 Finish: Plain, Black Oxide, Zinc Plated, Hot Dipped Galvanized, etc. Packing: Bulk about 25 kgs each carton, 36 cartons each pallet Advantage: High Quality, Competitive Price, Timely Delivery,Technical Support, Supply Test Reports Please feel free to contact us for more details.
Product Detail
Product Tags
Factory Price EN14399-4 and 8 System HV Structural nuts for South Korea Manufacturers Detail:
EN14399-4 and 8 System HV Structural nuts for High-Strength Structural bolting
Dimension Standard: EN14399-4 and 8
Metric Size: M12-M36
Material Grade: ISO 898-2 class 10
Finish: Plain, Black Oxide, Zinc Plated, Hot Dipped Galvanized, etc.
Packing: Bulk about 25 kgs each carton, 36 cartons each pallet
Advantage: High Quality, Competitive Price, Timely Delivery,Technical Support, Supply Test Reports
Please feel free to contact us for more details.
Product detail pictures:

All we do is usually affiliated with our tenet Buyer to start with, Belief to start with, devoting about the food packaging and environmental defense for Factory Price EN14399-4 and 8 System HV Structural nuts for South Korea Manufacturers, The product will supply to all over the world, such as: Kenya, Hungary, Hungary, We focus on providing service for our clients as a key element in strengthening our long-term relationships. Our continual availability of high grade products in combination with our excellent pre-sale and after-sales service ensures strong competitiveness in an increasingly globalized market.
80/20 Inc: Tri Corner Connector Overview
https://www.youtube.com/watch?v=_q2H1-J2b-8&feature=youtu.be
Hello, and welcome to 80/20′s product highlight series. Today we’re going to take a look at three-way corner brackets and connectors. These brackets are perfect for joining three bars together with one connection. They’re easy to install, and available in fractional metric, and compatible across a wide rang of profile series. Now as you can see, 80/20 offers a few different three-way brackets and connectors to fit any type of bar you may have; rounded angled, and squared bars.
Now one thing you want to keep in mind with these fasteners is they are a stand-alone part and bolt assemblies will be required to install them. Also due to the nature of these fasteners, your bars are going to need machined. Each of your three bars will need one end tap into them. More information on 80/20′s machining services and recommended bolt assemblies can be found in the 80/20 product catalog. Now when it comes to installing these fasteners, the first thing you’re going to want to do is feed your bolts through the brackets and into the bars.
Now in this example we have two of the bars already completed. To finish it up, we’ll take the connector and place it over the last bar. We’ll take our bolt and feed it into the end tap, we’ll take our wrench and tighten it the rest of the way down. Once you have the locked in, you have one bracket connecting three bars. Now one last option you’ll want to consider is an end cap. Simply fits right over the bracket, pops right over, and gives it a smooth clean finish.
Hopefully you have found this segment on three-way corner bracket and connectors helpful. For more information visit 8020.net and make sure to subscribe to future 80/20 videos. And as always, make it a great day.
80/20 Inc: Tri Corner Connector Overview
https://www.youtube.com/watch?v=_q2H1-J2b-8&feature=youtu.be
https://ford-trucks.com/how-tos is the leading Ford F-150 and Super Duty truck resource for technical DIY guides. All F-150s come with a raked stance, which means that the rear of the truck sits two or three inches higher than the front. That “stinkbug” stance isn’t the most attractive and also limits the maximum tire size on the front end. For the full step-by-step article, please visit https://www.ford-trucks.com/how-tos/a/ford-f150-how-to-install-leveling-kit-356295
The easiest way to lift the front end is by using a strut spacer. This component fits between the top of the strut hat and the strut bracket.
Because of truck’s electric power steering, you’ll want to disconnect the negative battery cable prior to starting work.
This easy job takes a few hours and costs around $200 dollars. A professional will likely charge double the DIY cost.
This job requires a 15 millimeter socket and wrench, 18 and 21 millimeter deep sockets, a 30 millimeter socket, a 1-1 16-inch wrench, a breaker bar socket wrench, a pry bar, a hammer, a tire iron, ratchet straps, two jacks and jack stands. A Pitman arm puller is optional.
Step One – Loosen the lug nuts
Loosen the lug nuts with your 21 millimeter socket and socket wrench or tire iron.
Trucks with OEM wheels will require popping off the center cap in order to access the lug nuts. Do this with a flat head screw driver or the flat portion of your tire iron. Use a rag or towel between the tool and the wheel to keep scratches to a minimum.
Step Two – Jack up the front end of the truck
Chock one of the rear wheels and place the truck in neutral, then lift the truck with the jack.
Do not use the parking brake as you do need to allow the rear wheels to move a little bit as you lift the truck.
This will allow the jack to work properly as it’s not trying to fight the rear wheels as it pivots up.
After getting the F-150 into the air high enough to remove the front tires, place two jack stands at the frame of the truck. Finish unscrewing the lug nuts and remove the tires.
Step Three – Unbolt the sway bar end-link
Unbolt the sway bar link from the control arm with an 18 millimeter socket. It’s easiest to remove it from the control arm, but removing the link nut at the sway bar itself isn’t hard either.
Step Four – Loosen the upper ball joint
Next, loosen the upper ball joint nut but don’t completely remove it.
Either use your hammer to knock out the ball joint from the spindle or use a Pitman arm puller to pry the joint apart.
If you use a hammer, strike the spindle near the ball joint. Don’t actually hit the ball joint or control arm, or else you will cause unnecessary damage to the suspension.
You might be able to simply pull the two apart if they’re loose enough.
Step Five – Loosen the lower strut bolt
Fit a 30 millimeter socket to the lower strut bolt and hold the nut with a 1-1 16-inch wrench. This can be a very, very tight nut and it may be wise to rent or borrow a power tool to help. A long breaker bar may assist a little as well.
Finish removing the bolt.
It’s okay to skip this step if removing the bolt is too difficult, but you do have to loosen it. Swing the strut downward to install the lift spacer to the top of the strut if the strut hasn’t been unbolted.
Step Six – Move the wheel spindle out of the way
With the lower strut bolt out or loose, take your jack and place it under your lower control arm to keep it slightly elevated and remove the upper ball joint nut. Take your pry bar and lift up on the upper control arm as you move the spindle out of the way. Use ratchet straps or strong line to keep the spindle supported.
Step Seven – Remove nuts from top of the strut
Slowly remove the three 15 millimeter nuts holding the strut top to its bracket if you have removed the lower strut bolt. Allow the jack to slowly drop the lower control arm and the strut assembly will follow. Be sure that it doesn’t drop out and onto the floor. If you still have the lower strut bolt on the lower control arm, you may have to pry down on the lower control arm a bit so the strut comes out of the bracket.
Step Eight – Install a spacer to the top of the strut
Follow the manufacturer’s instructions as they all vary somewhat. Some will use an extended stud on the strut bolts. Other spacers have studs already pressed in and will only need to be bolted to the strut.
After installation, put everything back together in the reverse order and get ready to do the other side.
After installing a leveling kit or doing any other suspension modification, your first trip should be towards the alignment shop. You have changed the angles of the control arms and tie-rods. In doing so, you have changed the camber and toe at the very least, but it’s recommended to get a full alignment—including caster.