Factory wholesale DIN913 DIN914 DIN915 DIN916 DIN551 Set Screws to Burundi Manufacturer
Short Description:
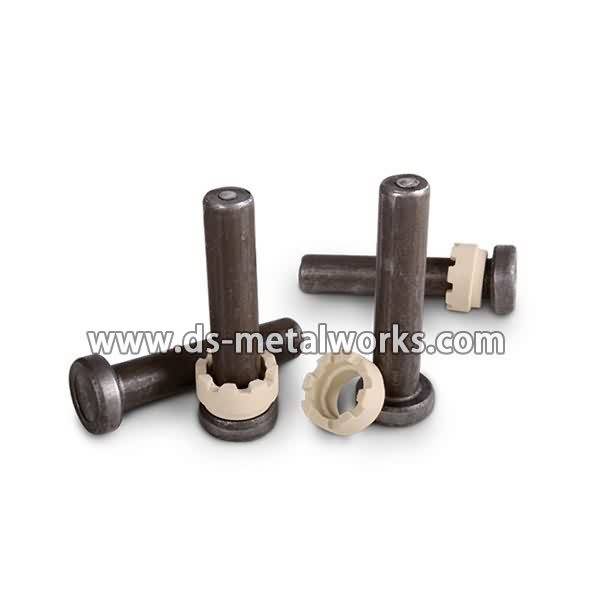
Metric Size Socket Set Screws Thread Size: M1.4-M52 DIN913, DIN914, DIN915, DIN916 ISO4026, ISO4027, ISO4028, ISO4029 Various Drive and Point Types Various Surface Finishes Other Material Grades are available Please feel free to contact us for more details
Product Detail
Product Tags
Factory wholesale DIN913 DIN914 DIN915 DIN916 DIN551 Set Screws to Burundi Manufacturer Detail:
Metric Size Socket Set Screws
Thread Size: M1.4-M52
DIN913, DIN914, DIN915, DIN916
ISO4026, ISO4027, ISO4028, ISO4029
Various Drive and Point Types
Various Surface Finishes
Other Material Grades are available
Please feel free to contact us for more details
Product detail pictures:

Quality initial, Honesty as base, Sincere support and mutual profit is our idea, so as to build repeatedly and pursue the excellence for Factory wholesale DIN913 DIN914 DIN915 DIN916 DIN551 Set Screws to Burundi Manufacturer, The product will supply to all over the world, such as: Irish, Southampton, Ghana, We can give our clients absolute advantages in product quality and cost control, and we have full range of molds from up to one hundred of factories. As product updating fast, we succeed in developing many high quality products for our clients and get high reputation.
PROFESSIONAL VIDEO TRIPOD WITH FLUID DRAG HEAD WF718
First impressions:
Right out of the Box
Strong, stable and a high quality finish.
Tripod:
This is a four section tripod held in place by flip locks with strong rubber feet.
I found the tripod to be very sturdy having all the qualities of a high end manufacture.
It has good independent leg spread to a total of three positions as seen at the end of this video review. The center column extends fully with a groove cut down the center to avoid rotation. The legs are held in place with what appear to be stainless steel hex bolts
Fluid Drag Head:
The WF718 Fluid Drag Head is made from what appears to be aircraft grade aluminum, it has a very good black finish to match the tripod. At first operation of the pan motion I found it to be stiff but after a few turns it became very fluid and almost silk like It has a locking knob on one side and an tension knob on the other going from very stiff to very smooth. The tilt motion is also very smooth
The cameras mounting plate has a locking function so you can easily remove and replace the camera. The main sliding mounting plate has a safety detent ‘pin’ that can be removed with the supplied tool. Witness makings help replacing the camera to it’s original position, helps when using follow focus and matt boxes.
As seen in CheesyCam’s review of the 717AH Video Fluid Head, the mounting collar and pan tension knob also clear the mounting surface, making it ideal for slider and dolly projects.
Over all I rate this with very high grades. 5 out of 5 Stars
amazon.com/ gp/product/ B003UOMX08?ie=UTF8&tag=dsma00-20&linkCode=as2&camp=1789&creative=9325&creativeASIN=B003UOMX08
Watch the full episode: https://www.youtube.com/watch?v=qBO2pcJuHvA
This Old House plumbing and heating expert Richard Trethewey heads to Cheyenne, Wyoming, to help a homeowner install a new toilet.
Click here to SUBSCRIBE to the official This Old House YouTube channel: https://www.youtube.com/subscription_center?add_user=thisoldhouse
Shopping List for Installing a New Toilet:
- Two-piece toilet
- Toilet seat
- Wax toilet ring
- Shutoff valve
- Stainless-steel water-supply line
- Emery cloth, used to clean copper pipe
- Shallow pan or small bucket, for catching water spills
- Cloth rag, for plugging the drainpipe
- Closet flange with closet bolts, used to secure the toilet to the drainpipe
- PVC drainpipe and fittings
- PVC primer and cement, used to glue the PVC drainpipe and fittings
- Masonry screws, for screwing the flange to a tile floor
Tools List for Installing a New Toilet:
- Drill/driver
- Screwdriver
- Internal pipe cutter, used to cut PVC drainpipe
- Hammer and cold chisel, for chipping off thinset mortar
- Tubing cutter, used to cut copper pipe
- Two adjustable wrenches, for tightening the compression fitting
- Pliers, used to tighten threaded fittings
- Wrench, for tightening the nuts on the toilet-tank bolts
- Carbide-tipped masonry bit, for drilling through tile
- Mini hacksaw, used to trim the closet bolts
Steps for Installing a New Toilet:
1. Turn off the water at the meter.
2. Open all faucets on the upper level of the house, then open the tub or shower valve in the bathroom where you’re installing the toilet.
3. Use emery cloth to buff clean the copper pipe stub-out protruding from the wall.
4. Put a shallow pan or a small bucket under the pipe stub-out to catch any water.
5. Use a tubing cutter to cut the pipe stub-out to the proper length.
6. Slip a new shutoff valve onto the pipe stub-out, then tighten the compression fitting with two adjustable wrenches.
7. Close all the faucets and valves opened in Step 2.
8. Turn the water back on at the meter.
9. Temporarily plug the toilet’s PVC drainpipe with a rag to block out sewer gases.
10. Trim the PVC drainpipe to the proper height using a drill/driver fitted with an internal pipe cutter.
11. Use a hammer and a cold chisel to chip away any excess thinset mortar from around drainpipe.
12. Glue a new closet flange onto the drainpipe with PVC primer and cement, then insert two closet bolts into the slots in the flange.
13. Drill through the mounting holes in the flange and into the ceramic tile with a carbide-tip masonry bit.
14. Secure the flange to the floor with masonry screws.
15. Bolt the toilet tank to the toilet bowl, making sure to install the included rubber gasket between the two parts.
16. Attach the toilet seat to the toilet bowl with the two included plastic bolts.
17. Press a wax toilet ring onto the closet flange, then remove the rag from the drainpipe.
18. Set the toilet over the closet bolts protruding from the flange. Press down on the toilet to compress the wax ring.
19. Place the washers and nuts onto each closet bolt and alternately tighten each nut with a wrench. Do not overtighten the nuts.
20. Use a mini hacksaw to trim each bolt.
21. Snap the included plastic cap onto each closet bolt.
22. Tighten one end of a stainless-steel water-supply line to the shutoff valve. Connect the other end to the fitting on the underside of the toilet tank.
23. Open the shutoff valve to fill the toilet tank with water.
24. Put the lid on the tank, then flush the toilet to check your work.
Follow This Old House and Ask This Old House:
Facebook: https://www.facebook.com/ThisOldHouse
Twitter: https://twitter.com/thisoldhouse
https://twitter.com/asktoh
Pinterest: https://www.pinterest.com/thisoldhouse/
G+: https://plus.google.com/+thisoldhouse/posts
Instagram: https://instagram.com/thisoldhouse
Tumblr: https://thisoldhouse.tumblr.com/