Good Wholesale Vendors ISO 13918 AWS D1.1 Shear Connector Welding Stud (Nelson stud) Wholesale to Liberia
Short Description:
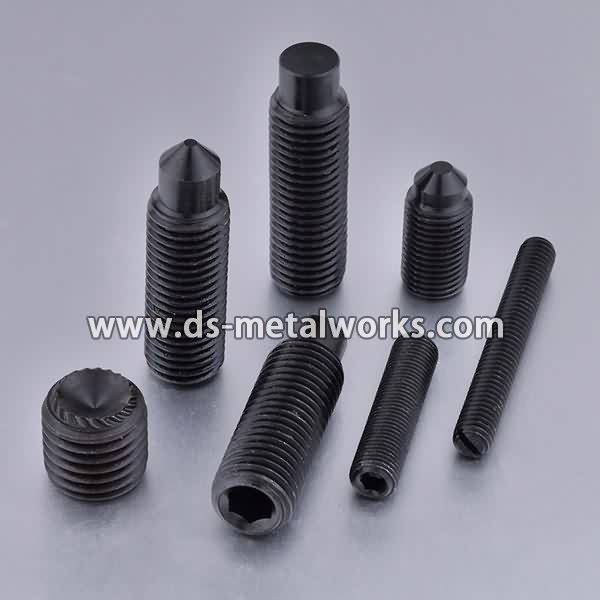
ISO 13918 AWS D1.1 Shear Connectors Welding Studs (Nelson studs) Standard: ISO 13918, AWS D1.1, Various configurations are available Metric Szie: Dia.10-Dia.25 with various lengths Inch Size: 3/8”-1” with various lengths Material Grade: : ISO 13918, AWS D1.1 Low Carbon Weldable Steel Finish: Plain Finish Packing: Bulk about 25 kgs each carton, 36 cartons each pallet Advantage: High Quality and Strict Quality Control, Competitive Price,Timely Delivery; Technical Support, Supply Test Reports Pl...
Product Detail
Product Tags
Good Wholesale Vendors ISO 13918 AWS D1.1 Shear Connector Welding Stud (Nelson stud) Wholesale to Liberia Detail:
ISO 13918 AWS D1.1 Shear Connectors Welding Studs (Nelson studs)
Standard: ISO 13918, AWS D1.1, Various configurations are available
Metric Szie: Dia.10-Dia.25 with various lengths
Inch Size: 3/8”-1” with various lengths
Material Grade: : ISO 13918, AWS D1.1 Low Carbon Weldable Steel
Finish: Plain Finish
Packing: Bulk about 25 kgs each carton, 36 cartons each pallet
Advantage: High Quality and Strict Quality Control, Competitive Price,Timely Delivery; Technical Support, Supply Test Reports
Please feel free to contact us for more details.
Product detail pictures:


We know that we only thrive if we can guarantee our combined rate competiveness and good quality advantageous at the same time for Good Wholesale Vendors ISO 13918 AWS D1.1 Shear Connector Welding Stud (Nelson stud) Wholesale to Liberia, The product will supply to all over the world, such as: Japan, Armenia, Manila, Now the competition in this field is very fierce; but we will still offer best quality, reasonable price and most considerate service in an endeavor to achieve win-win goal. Change for the better! is our slogan, which means A better world is before us, so let's enjoy it! Change for the better! Are you ready?
Video Tutorial on how to replace the sunroof rails on a BMW E39. The sunroof rails do have plastic parts which can break over time due to a lack of lubrication, sunroof being forced open/closed, or just from the plastic fatiguing over time. I would recommend replacing both sunroof rails while you are doing this procedure. This can be a time consuming procedure and the old sunroof slider may break and put excessive strain on the new rail which could also cause it to fail. You can only buy a kit from the dealer which comes with all the new parts rather than just the individual part you want to replace. I did use OEM parts for this repair as well. An easy way to detect if the sunroof rail is broken, you should be able to tilt the sunroof by hand, but the sunroof will not tilt on it’s own by the sunroof motor. This particular tutorial was done on a 1997 BMW 540i with a glass style sunroof.
Website: https://4diyers.com
Facebook: https://www.facebook.com/4diyers
Google Plus: https://plus.google.com/+4DIYers
Twitter: https://twitter.com/4DIYers
Instagram: https://www.instagram.com/4diyers/
Tumblr: https://4diyers.tumblr.com
Pintrest: https://www.pinterest.com/4diyers/
Tools/Supplies Needed:
-standard/flat screwdriver
-T25 torx bit
-small phillips screwdriver
-degreaser
-lithium grease
-right control rail kit PN 54-12-8-202-296
-left control rail kit PN 54-12-8-202-295
Procedure:
-when doing this repair, make sure you don’t get any grease on your headliner
-start my pulling back the rubber accordion pieces on each side by simply pulling straight out
-tilt the sunroof up by hand and use a rolled up cloth to hold it into place
-remove the three T25 torx bolts on each side (total of six)
-lift sunroof glass out and place in a safe area (I used my trunk)
-next remove the wind louver at the front of the sunroof opening by popping out the two springs on the front side, then pulling the louver straight up, and sliding out the arms on each side
-remove the stoppers at the front of each sunroof rail which are held in with T25 torx bolts (one on each side)
-remove the sliders from the rails on both sides
-now in this particular tutorial, we won’t be replacing the rear sliders because that does involve removing the sunroof driver cables
-on the metal flat brackets at the rear, remove the T25 torx bit (one on each side), then slide the pin out
-slide the arm portion of the sliders from the rails out on each side
-clean sunroof rails out using brake cleaner or some other form of degreaser, then re-lubricate sunroof rails with lithium grease
-split down new rear sliders and reinstall on existing rear slider
-re-installation in reverse
-as for re-installing sunroof glass, remove the brackets from the front slider rails by removing the phillips screws (one on each side) and install on the sunroof glass itself
-place sunroof glass back into place, then push front sliders forwards
-align sunroof and tighten bolts
-pushing sunroof back into roof, then tight Phillips screws on front sliders
-recheck to make sure sunroof is aligned with roof properly
-reinstall rubber accordion pieces
Thank you to all those who watch my videos and support my content. Don’t forget to subscribe to my channel for future tutorial videos and like my video if you found it helpful. New videos are always being uploaded every week!
© 4DIYers 2013
All Rights Reserved
No part of this video or any of its contents may be reproduced, copied, modified or adapted, without the prior written consent of the author.