Fast delivery for ASME B18.3 Socket Set Screws for Slovak Republic Factories
Short Description:
ASME B18.3 Socket Set Screws Imperial Thread Size: 0# – 2″ Various Drive and Point Types Various Surface Finishes Other Material Grades are available Please feel free to contact us for more details
Product Detail
Product Tags
Fast delivery for ASME B18.3 Socket Set Screws for Slovak Republic Factories Detail:
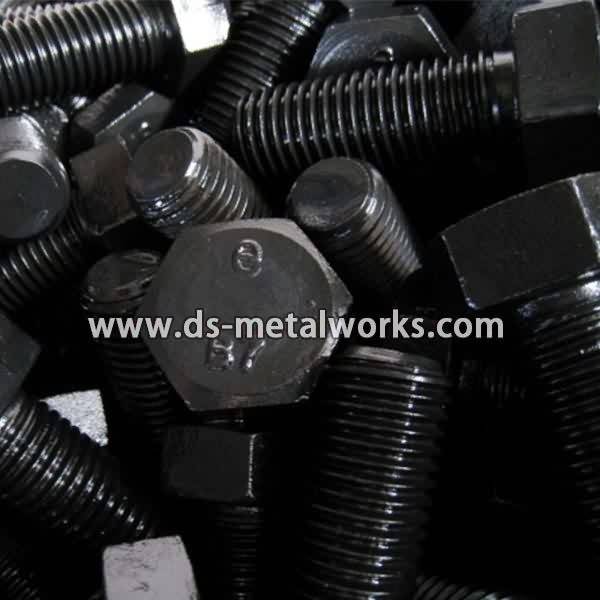
ASME B18.3 Socket Set Screws
Imperial Thread Size: 0# – 2″
Various Drive and Point Types
Various Surface Finishes
Other Material Grades are available
Please feel free to contact us for more details
Product detail pictures:

Being supported by an state-of-the-art and skilled IT team, we could supply technical support on pre-sales & after-sales service for Fast delivery for ASME B18.3 Socket Set Screws for Slovak Republic Factories, The product will supply to all over the world, such as: Melbourne, France, Stuttgart, We have a large share in global market. Our company has strong economic strength and offers excellent sale service. We have established faith, friendly, harmonious business relationship with customers in different countries. , such as Indonesia, Myanmar, Indi and other Southeast Asian countries and European, African and Latin American countries.
Learn how to install a SnowSport snow plow and benefit from it next time it snows! Go to https://www.realtruck.com/snowsport-hd-utility-snow-plow/ to learn more. The SnowSport HD Utility Snow Plow mounts easily using a 2″ front or rear receiver hitch.
877-216-5446
https://www.RealTruck.com
How to Install a SnowSport HD Utility Snow Plow
Video Transcript:
This video is to be used in conjunction with your owner’s manual, to help you with the assembly and mounting of your new SnowSport HD plow. You will need a receiver plow mount hitch installed on your vehicle before starting the plow assembly. Follow the written instructions for the mount kit for your particular model of truck.
Next, you will want to gather the tools showing on the list: Torque wrench, impact or ratchet with 9/16″ and ¾” socket, drill with 3/16″ and 5/16″ drill bits, #3 Phillips driver bit, ¾” box wrench, 5/16″ open end wrench, 3/16″ Allen wrench, bubble level and protective eyewear. Make sure your vehicle is parked on a level grade and you’re ready to get started.
Step 1: Insert interceptor into receiver and secure with the hitch pin. The interceptor can be installed with the big leg turned either up or down as needed for proper push frame clearance (showing turned up in this video). Bolt the push frame to the proper hole pattern on the interceptor, using four ½” x 4″ bolts with flat washers and lock nuts. Leave bolts snug tight for now.
Step 2: With the bolts snug tight, level the push frame horizontally. Then check push frame for vertical plumb. If plumb, tighten all 4 bolts and proceed. If not plumb, refer to the shimming procedure in step #2 of your owner’s manual.
Step 3: Align the end of the rubber edge with the matching channel of the bottom section of the aluminum blade. Slide the rubber edge into the channel until it’s centered on the aluminum blade. Take the top half of the blade and connect the tongue and groove joint with the bottom half. Slide the top section until it’s centered on the bottom section.
Step 4: At each end of the blade, insert 2 square nuts into each channel, flat side facing out. These nuts will be aligned with the holes at the top and bottom of the slide hinges. Place each slide hinge on the blade and align the edge of the hinge with the factory mark on the blade. When both hinges are properly aligned, they should measure 22-1/2″ apart. Turn the 3/8″ x ¾” hex bolts with flat washers into the nuts that were previously slid into the channels on both the top section of the blade and the bottom section of the blade. Double check to make sure each slide hinge is lined up with the factory mark. Then, tighten the hex bolts on the top section first. Then tighten the hex bolts on the bottom section. Using a 5/16″ bit, drill a hole through the blade in each factory punched hole on the slide hinge. Turn a 3/8″ x 1″ self-threading bolt into each drill down hole and tighten.
Step 5: At the tongue and groove joint drill a 5/16″ pilot hole at the factory mark in the “V” groove at each end of the blade. For a 96″ wide blade, there will be an extra hole drilled and bolt installed per side (see step #6 in your owner’s manual). Turn a 3/8″ x 1″ self-threading bolt into each pilot hole and tighten. Using a torque wrench, tighten all 6 bolts in each slide hinge to 31 foot pounds.
Step 6: At the bottom of the blade, double check that the rubber edges centered. Then, using a 3/16″ bit drill a pilot hole that each of the 4 factory marks in the “V” groove. Be sure to only drill through the first layer of aluminum and into the rubber. Using a #3 Philips bit, run a self-drilling screw into each of the 4 pilot holes; this prevents the rubber cutting edge from moving.
Step 7: Now hang the blade on the push frame in the transport position and insert the keyhole pins. Insert 2 square nuts into the top channel. With a hex nut turned onto the stud of the blade marker, align the blade marker with the hole on the lift handle and bolt the marker and handle to the blade. Using one of the square nuts in the channel, turn a 3/8″ x ¾” bolt into the other hole on the handle and thread it into the second nut that was slid into the channel. With the handle flush with the blade edge, tighten both bolts connecting the lift handle to the blade. Repeat at the other end.
Step 8: Attach the rubber box end to the blade using the metal cap plate and four 3/8″ x 2-1/2″ self-threading bolts. Tighten these bolts until the rubber end begins to compress to the blade. Insert a 5th bolt to tighten the bottom of the rubber end to the bottom of the metal cap plate. Secure this bolt with a flat washer and lock nut. Tighten all bolts equally and repeat at the other end.
The installation of the plow is now complete and your plow is ready for the winter season.
Amazon sells replacement tracks, just get the right length → https://amzn.to/2f0e2Dl
This tip works on all kinds of things, not just furniture. This is super handy for loose door hinges that are coming out of the frame.